1. Introduction
In this tutorial, we will demonstrate how to seamlessly integrate AzureAD as the identity provider for Spring Boot applications, offering a robust authentication mechanism for your application users.
2. Overview
AzureAD, Microsoft's comprehensive identity management product, is widely used by organizations worldwide. It supports multiple login mechanisms, providing a unified single sign-on experience across various applications within an organization. AzureAD integrates seamlessly with existing Active Directory installations, making user access management and permissions easy for administrators.
3. Integrating AzureAD
From a Spring Boot-based application perspective, AzureAD behaves as an OIDC-Compliant identity provider. This means we can use it with Spring Security by just configuring the required properties and dependencies.
To illustrate the AzureAD integration, we'll implement a confidential client, where the authorization code for access code exchange happens on the server side. This flow never exposes the access token to the user's browser, so it is considered more secure than the public client alternative.
4. Maven Dependencies
We start by adding the required maven dependencies for a Spring Security-based WebMVC application:
<dependency>
    <groupId>org.springframework.boot</groupId>
    <artifactId>spring-boot-starter-oauth2-client</artifactId>
    <version>3.0.3</version>
</dependency>
<dependency>
    <groupId>org.springframework.boot</groupId>
    <artifactId>spring-boot-starter-web</artifactId>
    <version>3.0.3</version>
</dependency>
Copy
The latest versions of those dependencies are available on Maven Central:
5. Configuration Properties
Next, we'll add the required Spring Security properties used to configure our client. A good practice is to put those properties in a dedicated Spring profile, which makes maintenance a bit easier as the application grows. We'll name this profile azuread, which makes its purpose clear. Accordingly, we'll add the related properties in the application-azuread.yml file:
spring:
  security:
    oauth2:
      client:
        provider:
          azure:
            issuer-uri: https://login.microsoftonline.com/your-tenant-id-comes-here/v2.0
        registration:
          azure-dev:
            provider: azure
            #client-id: externally provided
            #client-secret: externally provided
            scope:
            - openid
            - email
            - profile
Copy
In the provider section, we define an azure provider. AzureAD supports the OIDC standard endpoint discovery mechanism, so the only property we need to configure is issuer-uri.
This property has a dual purpose: Firstly, it is the base URI to which the client appends the discovery resource name to get the actual URL to download. Secondly, is it also used to check the authenticity of a JSON Web Token (JWT). For instance, the iss claim of a JWT created by an identity provider must be the same as the issuer-uri value.
For AzureAD, issuer-uri always has the form login.microsoftonline.com/my-tenant-id/v2.0, where my-tenant-id is the identifier of your tenant.
In the registration section, we define the azure-dev client, which uses the previously defined provider. We also must provide the client credentials through the client-id and client-secret properties. We'll get back to these properties later in this article when covering how to register this application in Azure.
Finally, the scope properties define the set of scopes that this client will include in authorization requests. Here, we're requesting the profile scope, which allows this client application to request the standard userinfo endpoint. This endpoint returns a configurable set of information stored in AzureAD's user directory. These may include the user's preferred language, and locale data, among others.
6. Client Registration
As mentioned before, we need to register our client application in AzureAD to get the actual values for the required properties client-id and client-secret. Assuming we already have an Azure account, the first step is to login into the web console and use the top-left menu to select the Azure Active Directory service page:
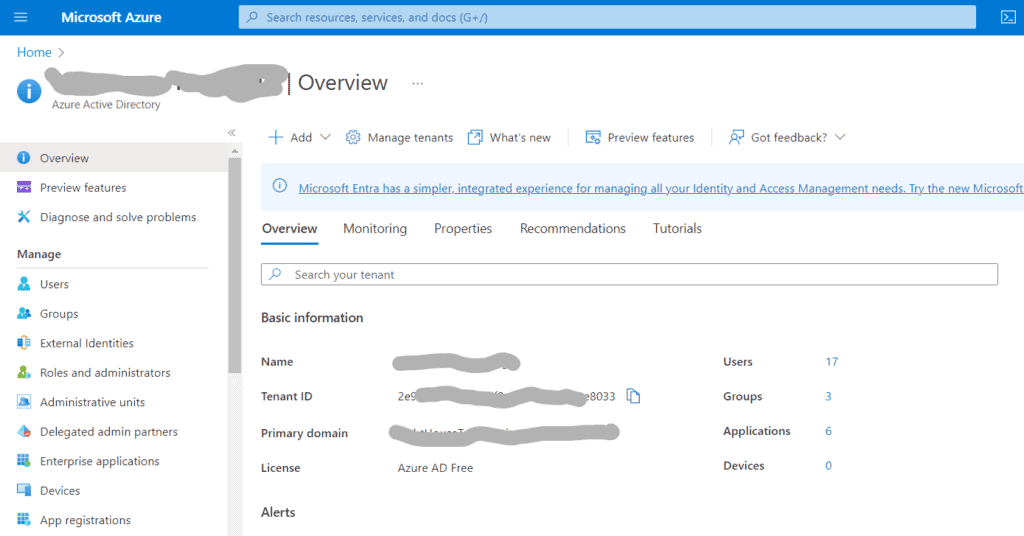
In the Overview section, we can get the tenant identifier that we need to use in the issuer-uri configuration property. Next, we'll click on App Registrations, which brings us to the list of existing applications, followed by clicking on “New Registration”, which shows the client registration form. Here, we must provide three pieces of information:
Application name
Supported Account Types
Redirect URI
Let's detail each of these items.
6.1. Application Name
The value we put here will be shown to end users during the authentication process. As such, we should choose a name that makes sense for the target audience. Let's use a very unimaginative one: “Baeldung Test App”:

We don't need to worry too much about getting the name right, though. AzureAD allows us to change it anytime without affecting the registered application. It is important to notice that, although this name doesn't have to be unique, it's not a clever idea to have multiple applications using the same display name.
6.2. Supported Account Types
Here, we have a few options from which to choose according to the target audience of the application. For applications intended for an organization's internal use, the first option (“accounts in this organizational directory only”) is usually what we want. This means that even if the application is accessible from the internet, only users within the organization can log in:

Other available options add the capability to also accept users from other AzureAD-backed directories, like any school or organization using Office 365 and personal accounts used on Skype and/or Xbox.
Although not that common, we can also change this setting later, but as stated in the documentation, users may get error messages after doing this change.
6.3. Redirect URI
Lastly, we need to provide one or more redirect URIs that are acceptable authorization flow targets. We must select a “platform” associated with the URI, which translates to the kind of application we're registering:
Web: authorization code vs. access token exchange happens at the backend
SPA: authorization code vs. access token exchange happens at the frontend
Public Client: Used for desktop and mobile applications.
In our case, we'll pick the first option as this is what we need for user authentication.
As for the URI, we'll use the value localhost:8080/login/oauth2/code/azure-dev. This value comes from the path used by Spring Security's OAuth callback controller, which, by default, expects the response code at /login/oauth2/code/{registration-name}. Here, {registration-name} must match one of the keys present in the registration section of the configuration, which is azure-dev in our case.
Also important, AzureAD mandates using HTTPS for those URIs, but there's an exception for localhost. This enables local development without the need to set up certificates. Later, when we move to the target deployment environment (e.g., Kubernetes cluster), we can add additional URIs.
Notice that this key's value has no direct relationship with AzureAD's registration name, although it makes sense to use a name that relates to where it is used.
6.4. Adding a Client Secret
Once we press the register button on the initial registration form, we'll see the client's information page:
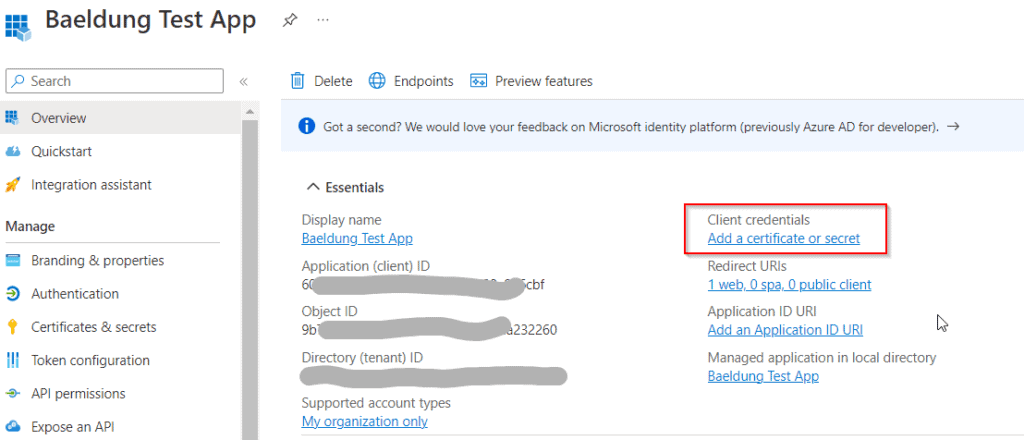
The Essentials section has the application ID on the left side, corresponding to the client-id property in our property file. To generate a new client secret, we'll now click on Add a certificate or secret, which takes us to the Certificates & Secrets page. Next, we'll select the Client Secrets tab and click on New client secret to open the secret creation form:

Here, we'll give a descriptive name for this secret and define its expiration date. We can choose from one of the preconfigured durations or choose the custom option, which allows us to define both the start and end date.
As of this writing, client secrets will expire after two years at most. This means we must put in place a secret rotation procedure, preferably using an automation tool such as Terraform. Two years may seem a long time, but, in corporate environments, applications that run for years before being replaced or updated are quite common.
Once we click on Add, the newly created secret appears on the client credentials list:

We must copy the secret value immediately to a safe place as it will not be shown again once we leave this page. In our case, we'll copy the value directly to the application's properties file, under the client-secret property.
In any case, we must remember this is a sensitive value! When deploying the application to a production environment, this value will usually be supplied through some dynamic mechanism, like a Kubernetes secret.
7. Application Code
Our test application has a single controller that handles requests to the root path, logs information about the incoming authentication, and forwards the request to a Thymeleaf view. There, it will render a page with information about the current user.
The actual controller's code is trivial:
@Controller
@RequestMapping("/")
public class IndexController {

    @GetMapping
    public String index(Model model, Authentication user) {
        model.addAttribute("user", user);
        return "index";
    }
}
Copy
The view code uses the user model attribute to create a nice table with information about the authentication object and all available claims.
8. Running the Test Application
With all pieces in place, we can now run the application. Since we've used a specific profile with AzureAD's properties, we need to activate it. When running the application through Spring Boot's maven plugin, we can do this using the spring-boot.run.profiles property:
mvn -Dspring-boot.run.profiles=azuread spring-boot:runCopy
Now, we can open a browse and access localhost:8080. Spring Security will detect that this request is not yet authenticated and will redirect us to AzureAD's generic login page:
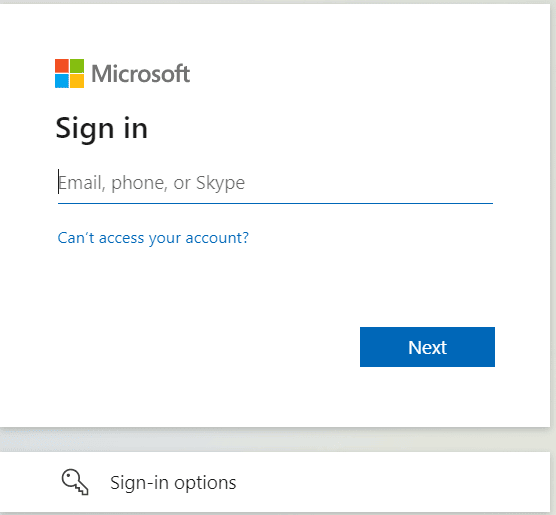
The specific login sequence will vary according to the organization's settings but usually consists of filling in the username or e-mail and supplying a secret. If configured, it can also request a second authentication factor. However, if we're currently logged on to another application in the same AzureAD tenant in the same browser, it'll skip the login sequence – this is what Single Sign-On is all about, after all.
The first time we access our application, AzureAD will also display the application's consent form:
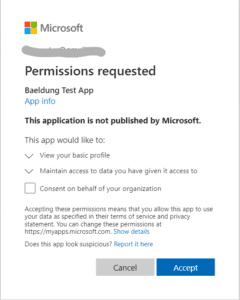
Although not covered here, AzureAD supports customizing several aspects of the login UI, including locale-specific customizations. Moreover, it is possible to bypass the authorization form entirely, which is useful when authorizing internal applications.
Once we grant permissions, we'll see our application's home page, partially shown here:
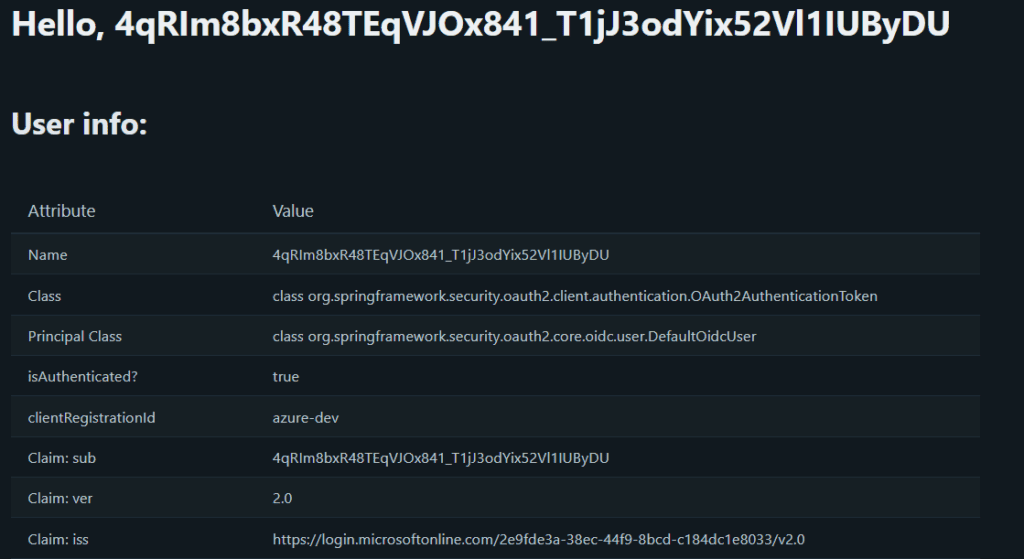
We can see that we already have access to basic information about the user, which includes his/her name, email, and even the URL to fetch his/her picture. There's one annoying detail, though: the value that Spring picks for the username is not very friendly.
Let's see how we can improve this.
9. Username Mapping
Spring Security uses the Authentication interface to represent an authenticated Principal. Concrete implementations of this interface must provide the getName() method, which returns a value that is often used as a unique identifier for the user within the authentication domain.
When using JWT-based authentication, Spring Security will use, by default, the standard sub claim value as the Principal‘s name. Looking at the claims, we see that AzureAD populates this field with an internal identifier, which is unfit for display purposes.
Fortunately, there's an easy fix in this case. All we must do is choose one of the available attributes available and put its name on the provider's user-name-attribute property:
spring:
  security:
    oauth2:
      client:
        provider:
          azure:
            issuer-uri: https://login.microsoftonline.com/xxxxxxxxxxxxx/v2.0
            user-name-attribute: name
... other properties omittedCopy
Here, we've chosen the name claim as it corresponds to the full user's name. Another suitable candidate is the emailattribute, which may be a good choice if our application needs to use its value as part of some database query.
We can now restart the application and see the impact of this change:
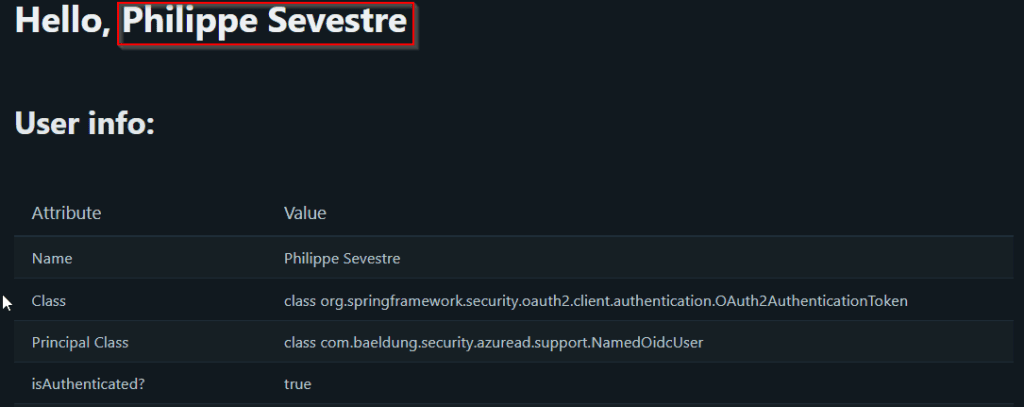
Much better now!
10. Retrieving Group Membership
A closer inspection of the available claims shows that there's no information about the user's group memberships. The only GrantedAuthority values available in the Authentication are those associated with the requested scopes, included as part of the client configuration.
This may be enough if all we need is to restrict access to organization members. However, it is often the case that we'll grant different access levels based on roles assigned to the current user. Furthermore, mapping those roles to AzureAD groups allows the reuse of available processes like user onboarding and/or reassignments.
To achieve this, we must instruct AzureAD to include group membership in the idToken that we'll receive during the authorization flow.
Firstly, we must go to our application's page and select Token Configuration on the right menu. Next, we'll click on Add groups claim, which opens a dialog where we'll define the details required for this claim type:
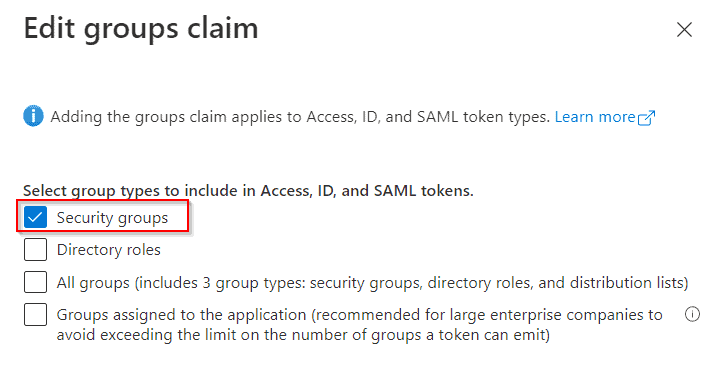
We'll use a regular AzureAD group, so we'll go for the first option (“Security Groups”). This dialog also has other configuration options for each of the supported token types. We'll leave the default values for now.
Once we click on Save, the application's claim list will show the groups claim:

Now, we can go back to our application to see the effect of this configuration:

11. Mapping Groups into Spring Authorities
The group claim contains a list of object identifiers corresponding to the user's assigned groups. Spring, however, does not automatically map those groups into GrantedAuthority instances.
Doing so requires a custom OidcUserService, as described in Spring Security's documentation. Our implementation, available online, uses an external map to “enrich” the standard OidcUser implementation with additional authorities. We've used a @ConfigurationProperties class where we put the required information:
The claim name from where we'll get the group list (“groups”)
A prefix for the authorities mapped from this provider
A map of object identifiers to GrantedAuthority values
Using a group-to-list mapping strategy allows us to cope with situations where we want to use existing groups. It also helps keep the application's role set uncoupled from the group assignment policy.
This is what a typical configuration looks like:
baeldung:
  jwt:
    authorization:
      group-to-authorities:
        "ceef656a-fca9-49b6-821b-xxxxxxxxxxxx": BAELDUNG_RW
        "eaaecb69-ccbc-4143-b111-xxxxxxxxxxxx": BAELDUNG_RO,BAELDUNG_ADMINCopy
The object identifiers are available on the Groups page:

Once all this mapping is done and we restart our application, we can test our application. This is the result we get for a user that belongs to both groups:
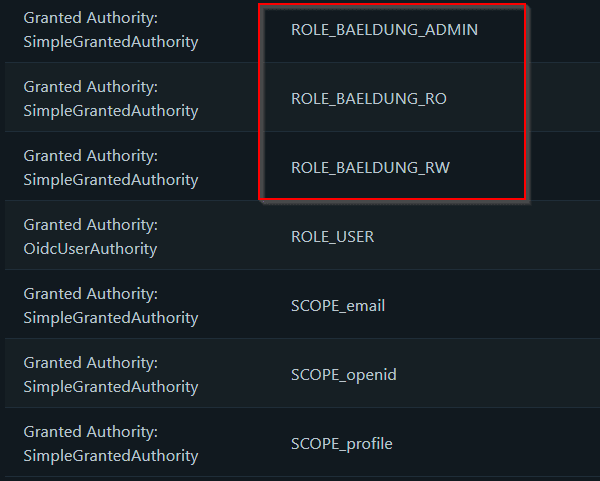
It now has three new authorities corresponding to the mapped groups.
12. Conclusion
By following this tutorial, you can seamlessly integrate AzureAD as the identity provider for your Spring Boot applications, providing your users with a secure and unified authentication experience. AzureAD's integration with Spring Security ensures a hassle-free implementation, allowing you to focus on building your application's core features.

